How to Eat, Move and Be Healthy: Top 5 tips to arrange your pantry and make your life easier
Pantry Perfection
It’s time to sniff your nuts…and your spices
It’s time to get that amazing feeling back. That feeling when you know you are in control of your life, your destiny…your pantry. You can deny it all you want, but you know deep down in your heart that being organised makes you feel lighter, brighter, and generally happier. . It’sIt is also the perfect time to kick some old habits out and embrace some new ones.
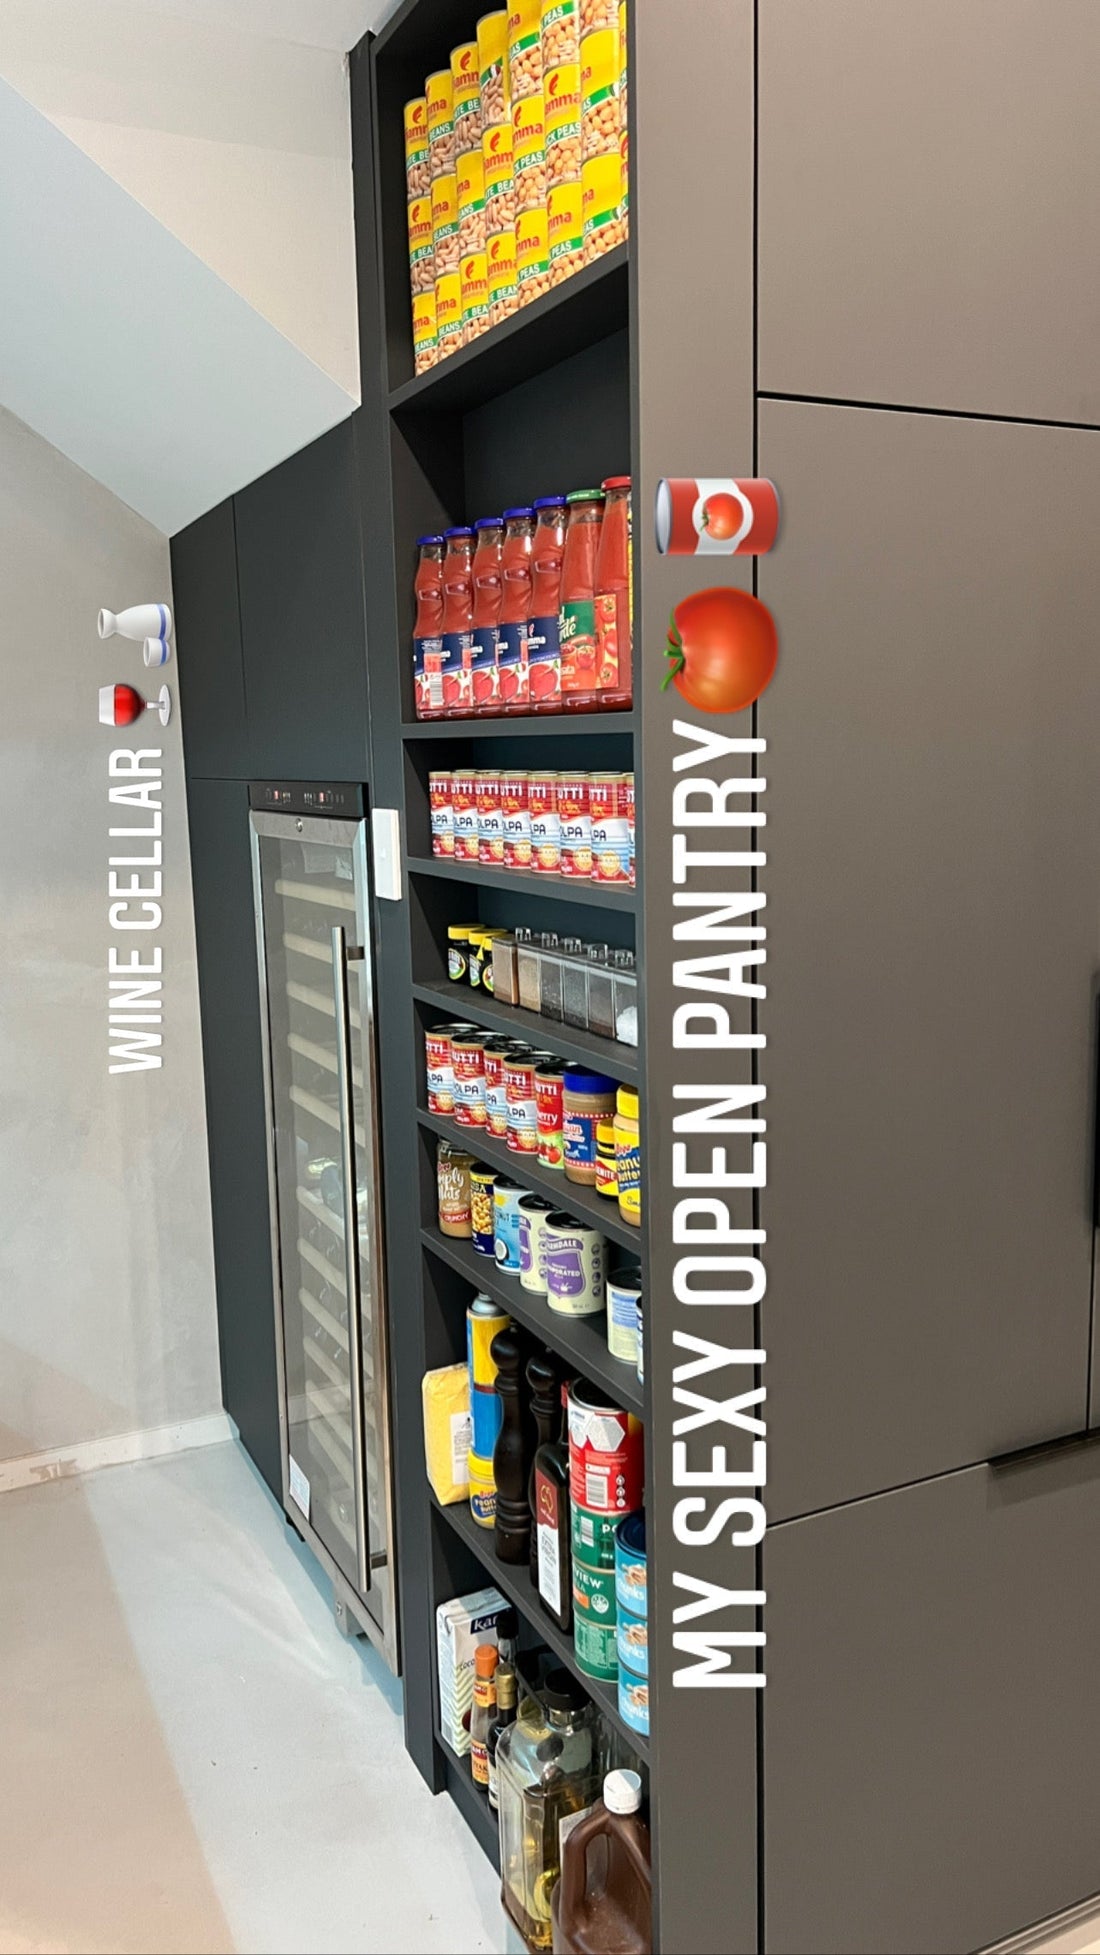
I steer towards being practical when I’m managing my pantry. Mine is a busy house with two starving teenagers, a husband that takes his lunch to work, and I often have work meetings in my gorgeous new kitchen, so I like to be prepared. To do this, I have split my pantry into categories, using easy to see containers, so I know at a glance what I need to top up on the next shopping trip. I also prefer to shop once a fortnight for the big stuff and hit the markets or the local fruit and veg for fresh produce as I need it. My fridge is an extension of the pantry, so it’s just as important to keep that clean and organised and make sure you know what’s in there.
Containers are a massive investment. My husband nearly fainted when I told him how much I had just spent on our new ‘system’ but it’s a worthwhile spend in my opinion, it really does help extend the shelf life of the food, and helps you create when it’s time to cook. Also, they look sexy, and I just love mine to bits. Get organised – nothing looks and feels better than a clean, organised pantry to get you in the mood to do some real cooking.
The BIG Pantry Makeover
This is NOT a pointless chore, this is an opportunity to get some order back in your life, so if you embrace it, you can really have so much fun.
Before you start:
- Choose a day when you have no interruptions and start with a jolly good cup of coffee or tea to get you in the mood. You’re going to need a few hours.
- Pop the music on, get into that active wear, and clear the kitchen bench AND the dining room table because you are going to need space.
- Wheel the big wheelie bin close to the kitchen door, it’s going to make it easier later for the clean-up when you’re tired.
- If you can rope in a willing assistant, even better.
|
How to increase the shelf life of pantry items and save thousands every year If you’re buying nuts, grains, rice and flours and you just aren’t using them before their sell-by date, I recommend increasing the shelf life by storing them in the freezer rather than the pantry. Stored in the freezer you’ll get months instead of weeks, years instead of months. Just don’t forget you put them there, and generally they can be used directly out the freezer when the time comes and put back after use. This is perfect for bulk nuts, flour and rice. You’ll save a fortune. |
OLD SPICE is not welcome in the pantry. Check the sell by date, as this could be the reason your cooking is not tasting that sexy anymore. If something smells old and rancid, believe it. You owe it to yourself to throw it in the compost and get some new fresh stuff. Having nutmeg from 1992 is not sexy. Spices that have lost their personality and flavour can ruin, rather than enhance, your cooking.
So now it’s time to sniff your nuts…and your spices and your oils and decide what stays and what goes. There is nothing more confronting than a stale pine nut or macadamia nut in a salad or a stir fry BUT they do have a short shelf life because of the high oil content, so store them in the fridge or the freezer and then you can take your time using them. Make a list of what you will need to buy to replace the old stuff.
OILS should be purchased in SMALL amounts. Rancid olive oil in a salad dressing is dismal and using oils that you have had for years is going to make your cooking taste terrible.
FAKE FRESH.
We need to learn about ‘fake fresh’. This is a skill I was taught as a chef. When you have stale crackers, water biscuits, corn chips, grissini, or biscuits because ‘someone’ left the packet open, you CAN save them provided they still SMELL fresh. You don’t always have to throw them out, this can be life changing indeed! Nothing worse than a soggy cracker on a cheeseboard and you know it. To FAKE FRESH these items, you can pre-heat your oven to about 200c and pop them in a single layer on a baking sheet for about 4-8 minutes but watch closely so you don’t burn them. This should freshen them up and they will go crunchy when they cool down. This will save your hundreds every year.
Some of my signature recipes for things you might need to use up excess items in your pantry
KETO CUBES
When you need a really healthy alternative to sugar and naughty chocolate, you will LOVE my quick and easy and extremely nutritious cubes of pleasure. Bursting with health-promoting ingredients, with no baking required, these will be a handy little pick me up for those days when you just ‘need a little something’.’
INGREDIENTS
- 1 cup chopped whole nuts, choose from almond, macadamia, Brazil or hazel, any of these will do. I pop mine in the food processor to blitz them into a nut gravel, so they toast faster. •
- 1 cup shredded or desiccated coconut •
- 1 cup dates, chopped or blended in processor (or use 1/4 cup powdered sweetener if you prefer) •
- 1 cup chia seeds, black or white •
- 1 cup peanut butter, I used crunchy organic •
- ½ cup cocoa nibs •
- ½ cup 70-90% dark chocolate, chopped or blended in processor •
- 5ml vanilla extract
- ½ cup water
- 1 cup protein/whey powder, I used vanilla because I like the flavour. (You could use almond meal instead)
- You will need an ice cube tray to shape the cubes. I got 36 cubes out of my batch, the exact amount will depend on the size of your trays.
|
CHEFS NOTE: This recipe is quite big, and very versatile, and gives me and my boys and my hubbie fabulous little treats to grab out the freezer on the way out the door. You can store these in the pantry on the shelf, but I keep them in the freezer in my silicone ice cube trays so that they are there for weeks or months (perfect if you have a smaller family than mine!) Feel free to follow my versatile options and make these YOUR own favourite treat. |
METHOD
- Toast the chopped/blended nut gravel and coconut in a frying pan on high heat. Stir to toast until nice and brown and deliciously fragrant (about 2-3 minutes) Don’t burn!
- Allow to cool and add the nut gravel and remaining ingredients into your stand mixer bowl with the whisk. Mix for about a minute until it forms a sticky wet crumb.
- Fill an ice-cube tray with the mix, packing it in with the back of the spoon.
- Place the trays on a flat surface and then pack tight with the palm of your hand. The chia, water and protein powder will start to set and keep these gorgeous treats together.
- Pop in fridge or freezer, covered, and then enjoy every-time you need a treat!
5 MINUTE GLUTEN FREE/KETO BREAD – ENOUGH FOR A WEEK
This little bread is a great way to use up excess items in the panty. It’s so delicious and easy to make that you will probably make this once a week. I love making it, then slicing it and storing some in the freezer, I can then toast it as I need it. Perfect for those on a keto or gluten free diet, or if you just like tasty nut breads.
INGREDIENTS
- 200ml water
- 200g almond meal
- 40g flax or chia or LSA mix
- 40g coconut flour
- 4 eggs
- 50g coconut oil or melted butter
- 1 teaspoon baking powder
- 1/2 teaspoon bicarb
- 1 teaspoon apple cider vinegar
METHOD
Simply blend all these ingredients together into a smooth paste, place into a greased baking dish and then bake at 180c for 15-25 minutes depending on the size of your container. I use two small pie dishes and then my cook time is 20 minutes, but you’ll have to adjust depending on the size of your dish. Once cooked, allow to cool and then you MUST store in the fridge to extend the life. I slice mine when cold and then all I have to do is pop into the toaster to refresh
Tinned goods turned into cheffy goodness
Tuna – sexy tuna salad stack (will add video link to my sexy tuna stack on Chef Mel TV)
BEANS
Purees are very cheffy and tins of beans are so inexpensive, you really need to learn how to make a sexy mash.
HAPPY YELLOW BUTTERBEAN PURÉE
INGREDIENTS
- 2 tins butterbeans, drained
- 1/4 cup cream or milk or simply use stock if you want to omit dairy
- 1 clove garlic, crushed
- ¼ teaspoon turmeric
- ¼ veggie or chicken stock cube to taste
METHOD
- Place all ingredients in a large saucepan and heat over a low heat, stirring regularly for about 10 minutes until wonderfully hot.
- Once the beans are heated through, simply mash with the metal head of a stick blender OR place in a food processor once cooled slightly. Either process completely or leave slightly chunky for a more rustic mash! Feel free to add some hot water to make this puree thinner if you don’t want it as thick. You can make this as thick or as thin as you like.
Guys this recipe is just too easy. If you have any roast carrots, butternut or sweet potato left over in the fridge, feel free to throw about half a cup of that roasted goodness in here too.
|
NOTE If you have leftovers, you can repurpose this as a sexy dip (drizzle with olive oil, crushed pistachios, and dukkha). Serve either serve chunky or as a puree. You can also change the flavour of these beans to suit or match your meal. These beans can take on multiple personalities so have fun! Add a teaspoon of chopped rosemary if you are matching lamb. Add a teaspoon of grainy mustard or horseradish if you are matching beef or pork. Add a teaspoon of curry powder if you are serving this with a curry. Add smoked garlic and smoked paprika to match a Spanish theme. |
Tinned tomatoes or jars of passata –
MASS MEATBALLS OR CHANGE YOUR LIFE BOLOGNESE
The reason my students call it this is because by cooking the mince FIRST, NOT the onion and the garlic, you will save heaps of time and never again witness grey liquid ‘crying’ out of your mince.
INGREDIENTS (SERVES 6-8)
- 1kg premium beef mince
- 1 large onion finely sliced
- 3-6 cloves garlic • 3 tablespoons fresh oregano/ thyme/marjoram or use 1 teaspoon dried Italian herb mix
- 1 carrot finely diced or grated
- 1 celery stalk finely grated
- 1 pinch nutmeg (very important!)
- 3 tablespoons olive oil
- 2-3 teaspoons beef stock powder or 2 stock cubes
- 1 tin chopped tomatoes
- 1 jar tomato passata (700ml)
METHOD
- First thing you should do is heat and grease a large pan until just about smoking hot.
- Now add the mince…we want the mince to sizzle when it hits the pan and IT SHOULD SIZZLE nice and loud and sexy. DO NOT STIR, I know you are worried about this burning, and you are also worried about lumps, but let the mince brown and seal on the first side you put down FIRST and let the pan heat up again and THEN you can stir ever so slightly just to get some more mince onto the base of the pan. My favourite mince ‘fluffer’ is one of those cheap plastic-coated whisks you get at the supermarket that only have about 4 loops. If you don’t have one of those use a strong plastic spoon or egg flip to break down the mince.
- Once the mince is brown and fragrant and sexy ALL BY ITSELF, then and only then do you add the finely chopped onion and garlic. There should be enough oil out of the mince that you have rendered off during your amazing sizzle-cooking of the mince at a nice high heat. If not add the olive oil. You can stir as much as you like now by the way, that mince is SEALED off!
- Now add the herbs, nutmeg, stock powder, grated/diced carrot and seasoning and stir through. Amazing colour isn’t it!
- Finally add the chopped tomatoes, vegetables and passata and you’re practically done. Turn down the heat and let that all cook through and then check the seasoning and it’s ready to serve. This way of cooking will not only save you time, BUT it will add valuable flavour and vibrant personality to your otherwise boring mince.
- Serve with fresh al dente spaghetti, shaved parmesan, and lots of freshly chopped parsley.
Got too much peanut butter?
QUICKIE CARB-FREE, GLUTEN FREE PEANUT BUTTER BREAD IN A MUG IN A MICROWAVE
INGREDIENTS
- 1 tablespoon crunchy or smooth peanut butter
- 1 egg
- 1/4 teaspoon baking powder
- 1 straight up & down coffee mug
- cooking spray
METHOD
- Mix the peanut butter, egg, and baking powder together by smashing against the side of a small bowl with the back of a tablespoon. You will have to keep scooping the paste back in and bringing it together. The thick peanut paste with take a bit of squishing to blend with the egg and powder but keep going.!
- Now put this batter into a greased coffee mug and cook in your microwave for 50 seconds. Cool and then slice and have on its own or with your favourite spread or as part of another dish. Too easy. Too cheap. Too brilliant.
Healthy Food Recipes
How to Eat Healthy
Healthy Recipes
Healthy Food
Quick Meal Prep
How to Eat, Move and Be Healthy
How to eat healthy on a budget
How to eat healthy food everyday